 Save
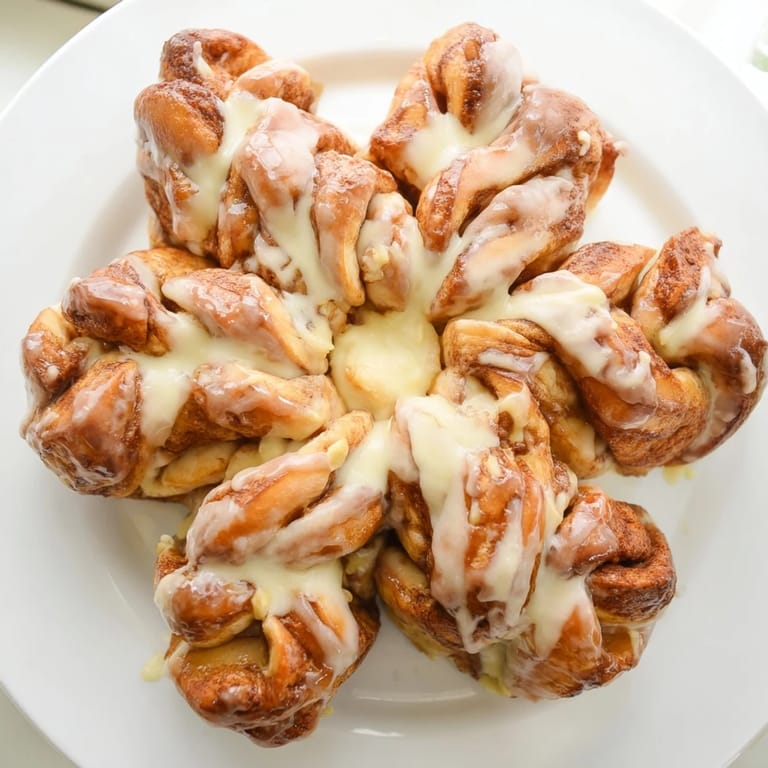
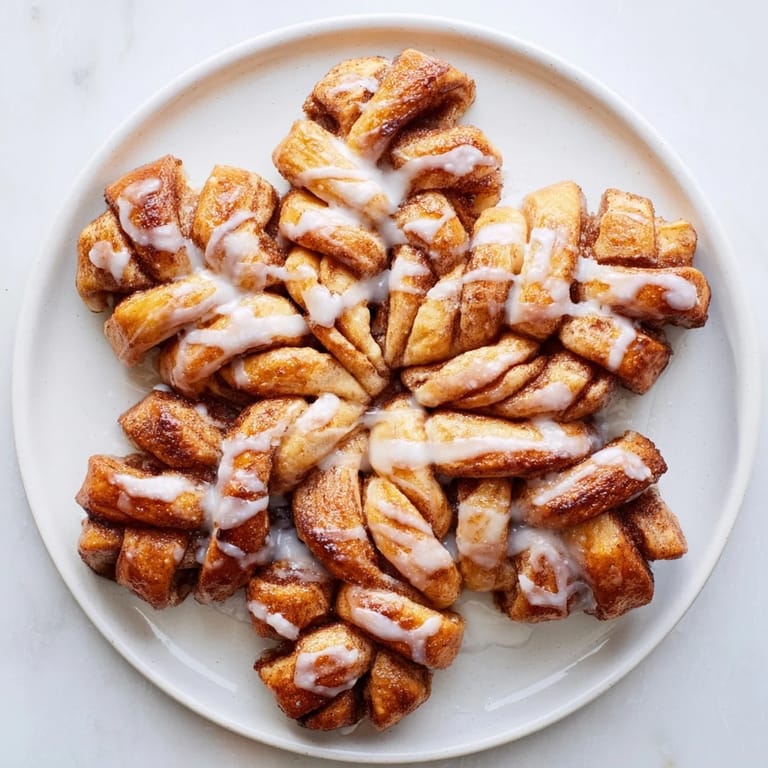
Save I discovered this snowflake shape purely by accident while flipping through an old magazine in my kitchen, and something about it made me want to try it immediately. There's something magical about food that looks like winter captured on a plate, and cinnamon rolls already feel like a warm hug on cold mornings. The idea of making it pull-apart, layered with buttery cinnamon sugar, felt like the perfect way to turn a simple breakfast into something that makes people pause and smile when they see it. That first time I twisted those dough strips into snowflake points, my hands were floury and I genuinely wasn't sure it would work, but when it came out of the oven all golden and shimmering with icing, I knew I'd found something special.
I made this for my sister's holiday open house last year, and I remember standing in her kitchen while people came back to the table again and again, tearing off pieces with their fingers and getting icing on their sweaters. My brother declared it better than the store-bought cinnamon rolls his wife had bought as backup, which was both hilarious and oddly touching. That's when I realized the snowflake shape wasn't just about looks—it gave people permission to eat with their hands, to be a little messy and joyful, which somehow made the whole morning feel less formal and more like a real celebration.
Ingredients
- All-purpose flour (3 1/4 cups): The foundation that needs to be warm and fresh—old flour can make your dough sluggish, so I always keep mine in an airtight container.
- Active dry yeast (2 1/4 tsp): This is your patience in a packet; make sure it's well within the expiration date or your dough won't rise, which I learned the disappointing way.
- Warm milk (3/4 cup): This should feel warm to your inner wrist, about bath water temperature—too hot kills the yeast, too cool and nothing happens.
- Granulated sugar (1/4 cup): Feeds the yeast and sweetens the dough without overpowering it.
- Unsalted butter (1/4 cup melted, plus 1/4 cup softened): The melted butter goes into the dough for richness, and the softened butter is your canvas for the cinnamon sugar.
- Egg (1 large): Brings tenderness and a slight golden color to the crumb.
- Salt (1/2 tsp): Balances sweetness and strengthens the gluten.
- Packed light brown sugar (1/2 cup): Softer and moister than white sugar, so it caramelizes beautifully in the oven.
- Ground cinnamon (2 tsp): Use fresh cinnamon if you can—stale spice is the silent killer of otherwise good baking.
- Powdered sugar (1 cup): For the icing drizzle that makes everything feel celebratory.
- Milk for icing (2–3 tbsp): Adjust slowly—you want a drizzle that flows but doesn't puddle.
- Pure vanilla extract (1/2 tsp): Never use imitation here; the real thing tastes like comfort.
Tired of Takeout? 🥡
Get 10 meals you can make faster than delivery arrives. Seriously.
One email. No spam. Unsubscribe anytime.
Instructions
- Bloom your yeast:
- Pour warm milk into a bowl with sugar and yeast, then step away for 5–10 minutes. You'll see it get frothy and alive, which is your signal that everything is working.
- Build the dough:
- Add melted butter, egg, and salt to your yeasty mixture, then gradually stir in flour until you have a shaggy, slightly sticky dough. Don't rush this part—let the flour absorb the liquid naturally.
- Knead to life:
- Flour your counter and knead for 5–7 minutes, pushing the heel of your hand into the dough and folding it back toward you. You'll feel it transform from rough to smooth and elastic, almost like it's coming alive.
- First rise:
- Place dough in a greased bowl, cover it with a clean towel, and let it sit in a warm spot for about an hour. It should double in size—poke it gently and if the indent stays, it's ready.
- Prep your workspace:
- Heat oven to 350°F and line a baking sheet with parchment paper while your dough rises.
- Divide and roll:
- Punch down your risen dough and cut it into three equal pieces. Roll each into a 12-inch circle, working gently so you don't deflate all your beautiful air.
- Layer with intention:
- Place the first circle on your sheet, spread half the softened butter across it, then sprinkle with half your cinnamon-sugar mixture. Top with the second circle, repeat the butter and cinnamon sugar, then crown it with the third circle.
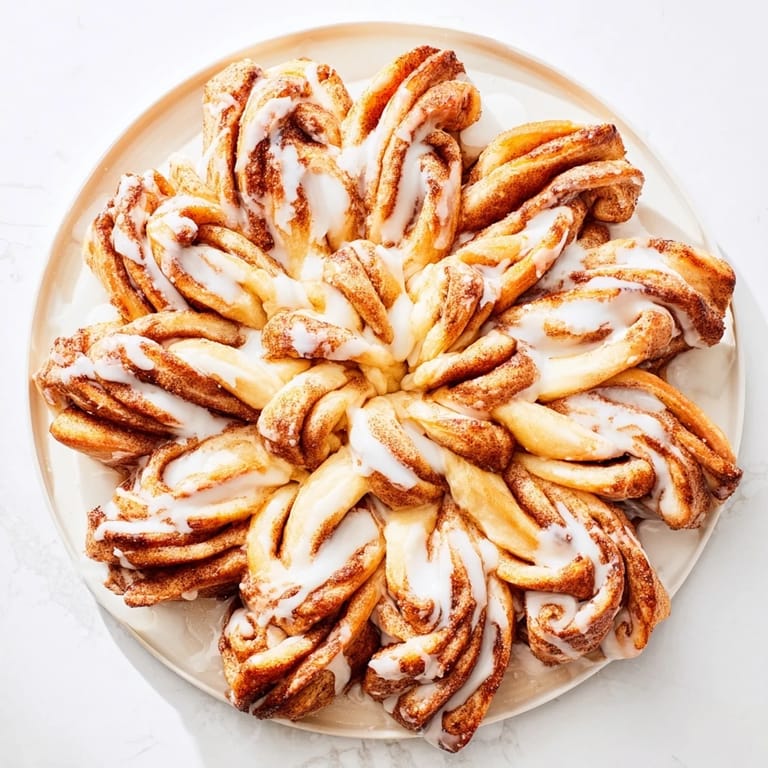
- Create the snowflake:
- Place a small glass in the center of your layered dough—this becomes your pivot point. Using a sharp knife, cut 16 equal strips radiating outward from the glass like you're drawing a starburst.
- Twist and pinch:
- Take two adjacent strips and twist them away from each other twice, then pinch their ends together to form a sharp point. This is meditative work, and each twist gives your snowflake more personality.
- Remove and rest:
- Carefully lift out the glass, cover your snowflake with a towel, and let it rise for 15 minutes while the oven preheats.
- Bake until golden:
- Bake for 22–25 minutes, watching until the edges turn deep golden brown and the kitchen smells like cinnamon and buttered dreams.
- Finish and drizzle:
- Cool for 10 minutes, whisk together powdered sugar, milk, and vanilla, then drizzle generously over the warm snowflake. Serve it pull-apart style and watch people dig in.
 Save
Save What made this recipe stick with me is watching my niece pull off a piece and literally gasp at how the layers stayed together—that moment when something you've made actually delights someone is worth every bit of the kneading and waiting. She now requests it every December, and honestly, that's all the validation I need.
The Magic of Layered Dough
There's a reason croissants and Danish pastries exist—layers of buttered dough create something that's simultaneously crispy and tender, and this snowflake captures that same magic but in a completely different form. Each piece has multiple layers of cinnamon sugar swirled throughout, so no matter where someone tears into it, they get that contrast of soft dough, buttery richness, and warming spice. I've found that letting the butter soften to room temperature instead of using it cold makes it spread evenly and bond with the dough better, which is the difference between flaky layers and dense dough.
Timing and Temperature Notes
The rise times in this recipe are flexible because kitchens are all different temperatures. On a cold winter day, you might need closer to 1 hour 15 minutes for the first rise, while on a warm day, 45 minutes might be enough. I use the poke test—gently press the dough, and if your finger indentation slowly springs back halfway, it's perfect. Shaping it on the baking sheet instead of doing it beforehand actually works in your favor because the dough gets a brief rest while it rises those final 15 minutes, which gives you more even browning.
Variations That Work and Why
The beauty of this recipe is how flexible it is without losing its charm. I've experimented with adding chopped toasted pecans or plump raisins to the filling, and they add texture that people genuinely notice and appreciate. Swapping half the milk for heavy cream makes the dough richer and slightly more tender, though I save that for special occasions because it's a bit more indulgent. Some mornings I've dusted the baked snowflake with a touch of cinnamon sugar before the icing while it's still warm, and it creates a subtle sparkle that looks intentional and elegant.
- For extra richness, replace half the milk (6 tablespoons) with heavy cream, which gives a more tender crumb.
- Toast chopped pecans lightly in a dry skillet before adding them to the filling so their flavor really sings.
- Let the icing set for a minute before serving if you want cleaner hands, or drizzle it generously while warm if you want that dreamy, dripping look.
 Save
Save This snowflake has become my answer to the question of what to make when I want to feel like I've done something special for the people I love. There's magic in pulling apart something beautiful together, and that's exactly what this recipe delivers every single time.
Cooking Q&A
- → How do I achieve the snowflake shape?
Roll out the dough into three layered circles, place a glass in the center, and cut 16 strips radiating outward. Twist adjacent strips twice away from each other and pinch the ends to create the snowflake effect.
- → What is the best temperature for proofing the dough?
Maintain a warm environment around 75-85°F (24-29°C) to allow the dough to rise properly without drying out or overproofing.
- → Can I add extra flavorings to the filling?
Yes, toasted pecans or raisins can be added to the cinnamon sugar filling for additional texture and flavor.
- → How should I store leftovers?
Store cooled pastries in an airtight container at room temperature for up to 2 days or refrigerate for longer freshness. Warm before serving.
- → Why is the dough kneading important?
Kneading develops gluten which gives the dough elasticity and a soft, pillowy texture after baking.