Save
Save My cousin called me in a panic two weeks before her graduation, asking if I could help with desserts for her backyard celebration. I'd never made decorated cupcakes before, but something about the challenge excited me—the idea of turning something simple into something that said congratulations without being over the top. That afternoon, I discovered that graduation caps could actually be made from candy, and suddenly these cupcakes became the centerpiece everyone wanted to photograph.
Standing in my cousin's kitchen the morning of her party, I piped frosting swirls while her younger siblings placed the graduation caps on each cupcake, debating which candies looked most like real mortarboards. When we set them on the dessert table, people kept circling back to them—not just to eat them, but to admire the detail. That's when I realized these weren't just cupcakes; they were edible congratulations cards.
Ingredients
- All-purpose flour: This is your structural backbone, and measuring by weight rather than volume keeps these cupcakes consistently tender and never dense.
- Granulated sugar: Works with butter to create that light, fluffy crumb that makes each bite feel celebratory.
- Unsalted butter: Allows you to control the salt level and gives the cupcake a cleaner, richer flavor than salted varieties.
- Large eggs: Bind everything together while adding moisture and richness that makes these taste homemade, not from a box.
- Whole milk: Keeps the batter tender and creates a more delicate crumb than water would.
- Baking powder: Your leavening agent, giving these cupcakes that gentle rise and airy texture.
- Pure vanilla extract: The small detail that elevates plain cupcakes into something worth remembering.
- Powdered sugar: Creates silky frosting when beaten with butter, and sifting it prevents lumps that could ruin your swirls.
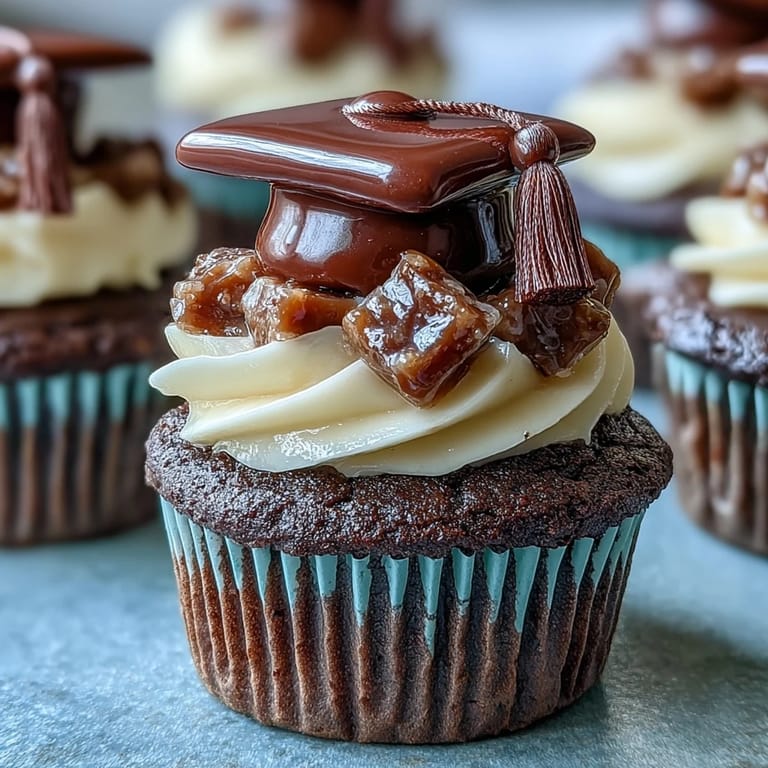
- Mini peanut butter cups: The foundation of your graduation cap, though chocolate squares work just as well for nut-free celebrations.
- Chocolate square candies: The mortarboard itself, flat and sturdy enough to hold everything else.
- String licorice or sour candy strips: Your tassel, adding the detail that makes these toppers unmistakably graduation caps.
- Mini M&Ms or candy pearls: The tiny finishing touch that catches light and makes each cap feel complete.
Tired of Takeout? 🥡
Get 10 meals you can make faster than delivery arrives. Seriously.
One email. No spam. Unsubscribe anytime.
Instructions
- Set the stage:
- Preheat your oven to 350°F and line your muffin tin with paper liners, which prevents cupcakes from sticking and makes serving cleaner. This small step saves frustration later.
- Cream butter and sugar:
- Beat these together until the mixture is pale and fluffy, which takes about 2-3 minutes—you'll see the color lighten and feel the texture become airy. Add eggs one at a time, letting each fully incorporate before adding the next, then stir in vanilla.
- Combine dry ingredients:
- Whisk flour, baking powder, and salt together in a separate bowl, which distributes the leavening evenly throughout. This prevents pockets of bitterness from concentrated baking powder.
- Alternate wet and dry:
- Add half the dry mixture to your butter mixture, stir gently, then add the milk, then the remaining dry ingredients, mixing just until combined. Overmixing develops gluten and creates tough cupcakes, so stop as soon as you don't see dry streaks.
- Fill and bake:
- Divide batter evenly among liners and bake for 18-20 minutes until a toothpick comes out clean or with just a few crumbs. Let them cool completely in the pan, then transfer to a rack before frosting.
- Make the frosting:
- Beat softened butter until smooth, then gradually add powdered sugar so it incorporates without flying everywhere. Add milk, vanilla, and salt, then beat until fluffy and spreadable, which should take about 2-3 minutes of steady beating.
- Frost with intention:
- Use a piping bag or the back of a spoon to create swirls on each cupcake, which gives them visual appeal and a professional finish. Don't worry about perfection—slight imperfections look homemade and charming.
- Build your graduation caps:
- Place a chocolate square flat-side up as your mortarboard, then attach a mini peanut butter cup upside-down in the center using a dab of melted chocolate or frosting as glue. Add a licorice tassel to one corner and a mini M&M or pearl as the button, then let everything set for a few minutes before placing on cupcakes.
- Crown your cupcakes:
- Once the cap toppers have set slightly, carefully place each one on a frosted cupcake, pressing gently so it sits securely. They're ready to celebrate.
 Save
Save Days after the party, I found a photo my cousin had taken of the dessert table with those cupcakes front and center. She'd written on the back, 'These made my day feel special.' That's what made me understand the real magic of these—they're not just about the cake or the frosting, but about showing someone you took the time to create something they'd remember.
Customizing Your Cupcakes for School Colors
The frosting is your canvas for showing school spirit. You can add gel food coloring to the buttercream to match your graduate's school colors—just add a tiny amount, stir well, and add more if needed, since colors deepen as they sit. If you want a two-tone effect, divide the frosting between two bowls before coloring, then swirl them together on each cupcake for a striped effect that looks intentional and striking.
Handling Nut Allergies with Confidence
Since graduation parties often gather people you don't know well, taking nut allergies seriously shows real care. Swap the peanut butter cups for extra chocolate squares or other candy options, and always read candy labels carefully because some facilities process nuts even if the candy itself doesn't contain them. If you're unsure about any ingredient, it's better to skip it than to guess.
Storage and Make-Ahead Strategy
You can bake the cupcakes up to two days ahead and store them in an airtight container at room temperature, which actually lets the crumb settle and become even more tender. Frost them the morning of your event so they look fresh and the buttercream stays glossy, and assemble the cap toppers shortly before serving so they don't soften from sitting in warmth.
- Unfrosted cupcakes can also be wrapped individually and frozen for up to a month, thawing at room temperature before frosting.
- If you're making these for a large group, bake in batches rather than rushing through one session so each batch gets your full attention.
- Don't stress about assembly perfection—slight tilts and quirks make these toppers charming, not flawed.
 Save
Save Making these cupcakes is less about following a recipe perfectly and more about spending time creating something that says you care. Whether you're celebrating graduation, a promotion, or any milestone that deserves sweetness, these cupcakes carry that intention in every bite.
Cooking Q&A
- → How are the cap toppers assembled?
Each topper combines a chocolate square topped with an inverted mini peanut butter cup, attached with melted chocolate or frosting. Licorice strips form tassels, accented by mini candies as buttons.
- → Can I make these nut-free?
Yes, substitute mini peanut butter cups with chocolate squares to avoid nuts and ensure allergen safety.
- → What is the baking time for the cupcakes?
Bake the cupcakes for 18–20 minutes at 350°F (175°C) until a toothpick inserted comes out clean.
- → How should the cupcakes be stored?
Store in an airtight container at room temperature for up to two days to maintain freshness.
- → Is it possible to customize the frosting color?
Yes, food coloring can be added to the buttercream to match school or party colors for a personalized look.