 Save
Save My daughter came home from preschool with a drawing of a bunny, and I knew right then that Easter needed something special. That Sunday morning, as I pulled this vanilla cake from the oven, the kitchen filled with this golden, buttery warmth that made everyone gather around before we'd even finished cooling it. Shaping it into bunny ears felt like pure magic—suddenly we weren't just baking, we were creating a centerpiece that made the whole holiday feel alive.
I'll never forget my neighbor peeking over the fence as I assembled this on our picnic table, her eyes widening like she'd stumbled onto something from a fairy tale. The way everyone's faces lit up when we brought it to the table—even the teenagers forgot to be cool for a moment. That's when I realized cakes like this aren't really about the ingredients; they're about the memory you're building together.
Ingredients
- All-purpose flour (2 ½ cups): The foundation of your tender crumb—measure by spooning into your cup and leveling off rather than scooping, or you'll end up with a dense bunny.
- Baking powder (2 ½ tsp): This lifts the cake so the vanilla really shines without any heaviness.
- Salt (½ tsp): A pinch that nobody notices but everyone tastes—it grounds all that sweetness.
- Unsalted butter (1 cup for cake, 1 cup for frosting): Softened means it should feel almost like a sponge when you press it; this is where your fluffiness begins.
- Granulated sugar (2 cups): Beaten with butter for those full three minutes creates tiny air pockets that make the cake tender.
- Eggs (4 large): Add them one at a time so they fully incorporate—rushing this step leads to a grainy texture nobody wants.
- Pure vanilla extract (1 tbsp plus 1 ½ tsp): The real stuff transforms a plain cake into something memorable; imitation simply won't do the work here.
- Whole milk (1 cup plus ¼ cup): The acid in milk helps activate your baking powder and keeps everything moist without being sticky.
- Powdered sugar (4 cups, sifted): Sifting matters here because lumps are textural enemies in frosting.
- Sweetened shredded coconut (2 cups): This creates that signature fluffy bunny coat—toast it first if you want deeper, nuttier flavor.
- Pink food coloring: A few drops tint the inner ears and nose; use gel coloring if you have it since liquid can thin your frosting.
- Jelly beans or candy-coated chocolate eggs: These become the bunny's eyes and speckled decoration—pick whatever matches your spring mood.
- Licorice strings: Cut into short pieces for whiskers, they add whimsy and a playful texture contrast.
- Mini marshmallows: These become cheeks and the fluffy tail—they stick easily to fresh frosting.
- Black edible gel or chocolate chips: For the nose and eyes, making your bunny come alive.
Tired of Takeout? 🥡
Get 10 meals you can make faster than delivery arrives. Seriously.
One email. No spam. Unsubscribe anytime.
Instructions
- Prepare your stage:
- Preheat your oven to 350°F and grease those cake pans generously with butter, then dust with flour—this prevents the ears and edges from sticking and crumbling when you turn them out. Having everything ready means you're not scrambling once the mixing begins.
- Mix your dry ingredients:
- Whisk flour, baking powder, and salt in a bowl and set it aside—this aerates the flour and ensures even distribution of the leavening. It's a small step that prevents dense pockets in your finished cake.
- Cream butter and sugar:
- Beat them together for the full three minutes until the mixture looks pale and almost cloud-like, which means you've incorporated air. This is where the magic of a tender crumb begins, so don't skip ahead.
- Incorporate eggs carefully:
- Add each egg one at a time, beating well after each addition, then mix in the vanilla—this ensures the eggs fully emulsify rather than creating a curdled mess. Take your time here; patience with eggs is patience with texture.
- Alternate wet and dry:
- Start with some flour mixture, then milk, then flour again, ending with flour to seal in moisture—fold gently with a spatula to avoid overworking the batter. This method prevents streaky, dense cakes better than any other technique.
- Divide and bake:
- Split the batter evenly between your prepared pans and smooth the tops with a spatula, then bake for 30-35 minutes until a toothpick comes out clean. The cakes will smell incredible and bounce back slightly when you gently press them.
- Cool with patience:
- Let them rest in the pans for ten minutes (this sets the structure), then turn them out onto a wire rack to cool completely—trying to frost warm cake is like painting on wet canvas. A few hours or even overnight cooling makes your cake more stable and less crumbly.
- Make the frosting:
- Beat the softened butter until creamy, then gradually add sifted powdered sugar, milk, and vanilla, beating until fluffy and light—this takes about five minutes of steady beating. The gradual addition prevents powdery streaks and keeps the texture smooth.
- Tint the ears:
- Set aside half a cup of white frosting in a small bowl and stir in a few drops of pink food coloring until you reach a soft blush tone. This frosting will become the inner ear details and nose, so don't make it too dark or it overwhelms the bunny's delicate face.
- Shape the bunny:
- Take your second cake and use a serrated knife to cut ear shapes (think tall ovals) and a small bow tie piece, then arrange everything on your board—one round for the face, ears above, bow tie below. The cutting doesn't have to be perfect; crooked ears are actually more charming and character-filled.
- Apply the crumb coat:
- Spread a thin layer of white frosting over the entire assembled bunny, then refrigerate for fifteen minutes—this seals in crumbs so your final frosting looks clean and professional. This step takes five extra minutes but transforms the whole appearance.
- Frost generously:
- Cover the bunny with the remaining white frosting, using an offset spatula to create soft swirls and texture—this is where it starts looking like the fairy-tale cake you imagined. Work in sections if you get nervous; there's no rush.
- Add the coconut coat:
- Press shredded coconut all over the frosted surfaces while the frosting is still soft, covering every white inch—this creates that signature fluffy bunny appearance. Your fingers work better than any tool for this, so don't be shy about getting hands-on.
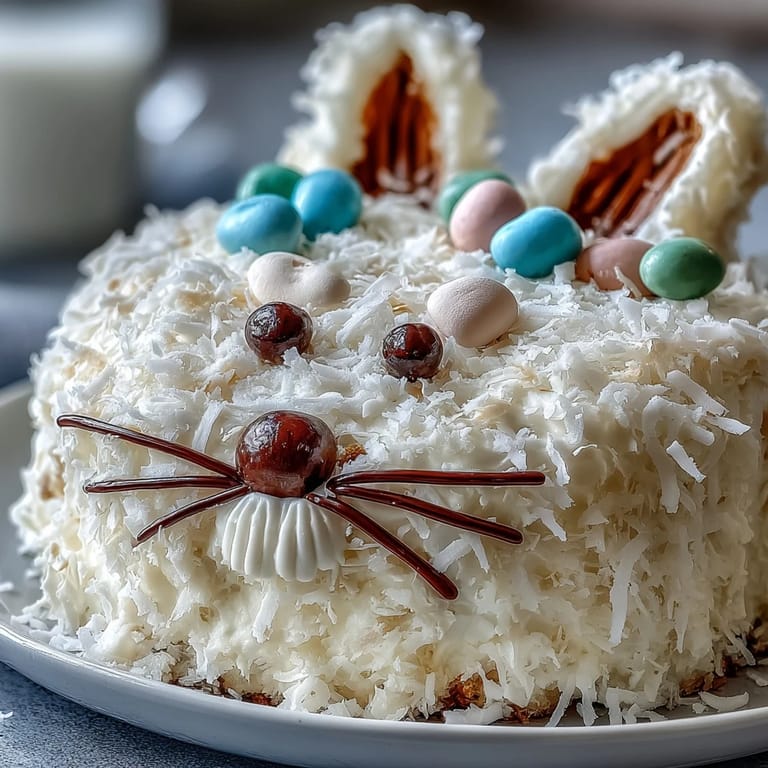
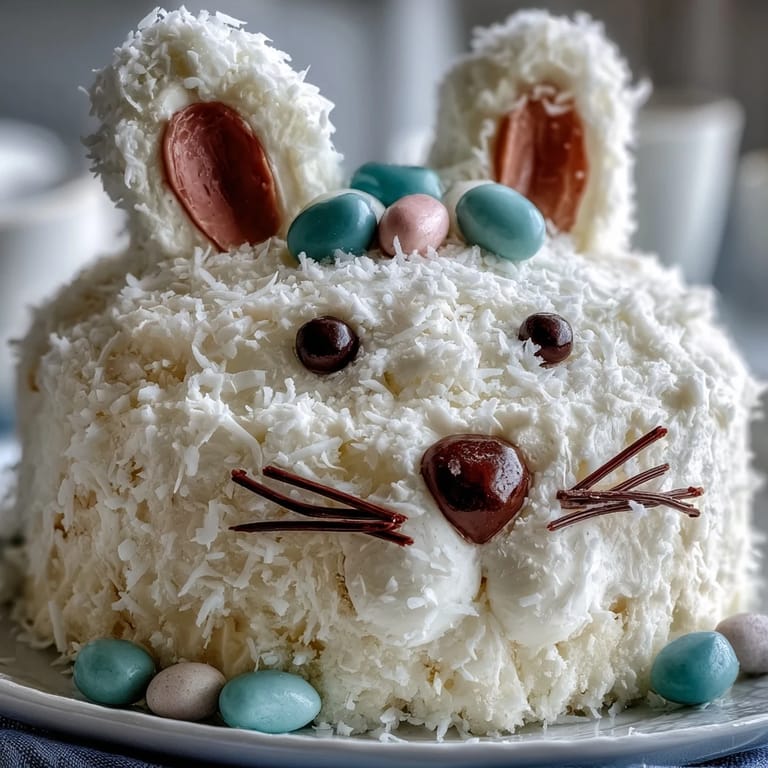
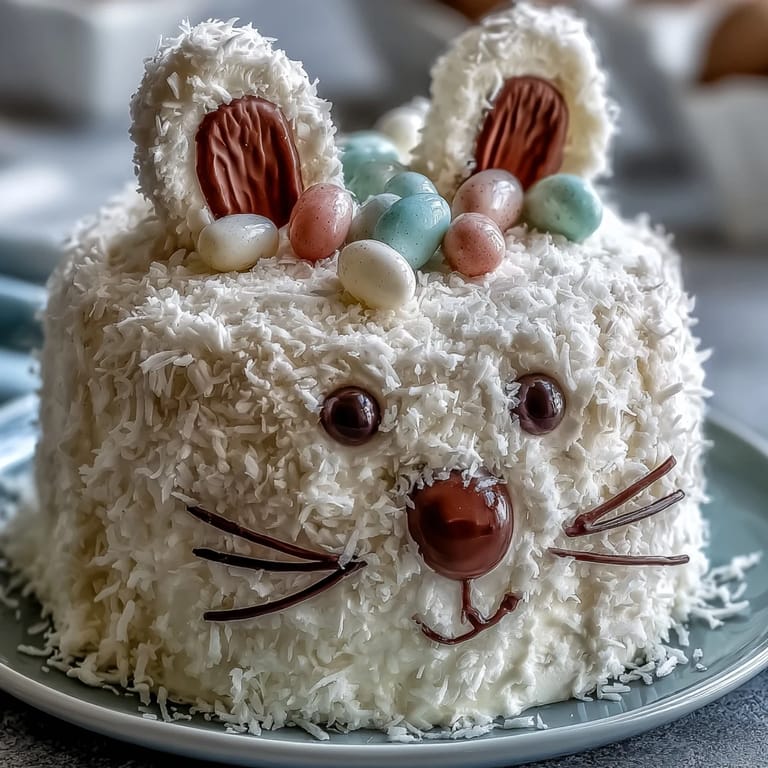
- Decorate the face:
- Use the pink frosting to fill the inner ears and create a nose, then arrange jelly beans for eyes, licorice strings for whiskers, mini marshmallows for cheeks and tail, and chocolate for the nose—let yourself have fun here because this is the personality moment. Step back and look at your bunny; you've just created something special.
 Save
Save The moment my sister's little ones decorated their own marshmallow cheeks and licorice whiskers, I understood why people love this cake beyond the taste. It became less about getting every detail perfect and more about watching faces concentrate, giggle, and create something they'd made together—that's the real Easter magic.
The Secret to a Sturdy Bunny
One year I tried to get fancy and over-frost, and the whole bunny started leaning like it had had too much to drink by dessert time. That's when I learned that structural integrity matters: make sure both cake layers are completely flat (level them if needed), and don't skip the crumb coat, which acts like a protective primer. The frosting should be thick enough to hold shape but spreadable enough to work with; if it stiffens up, a tiny bit of warm milk brings it back to life.
Timing and Make-Ahead Magic
The beauty of this cake is that you can bake the layers a full day ahead, wrapped tightly, which actually improves their structure and makes them less likely to crumble. The day of your celebration, make the frosting, assemble, and decorate—this turns a three-hour project into a one-hour finale. Even the decoration can happen a few hours early if you keep the finished bunny in a cool spot, covered loosely with plastic wrap.
Variations That Feel Just as Special
If coconut isn't your family's thing, cream cheese frosting creates a tangy sophistication that adults lean toward, while toasted coconut deepens the flavor for those who want something less sweet. You could also tint the entire frosting pastel yellow or blue instead of white, or swap the vanilla cake for almond extract for a more delicate flavor. The decorating part is where you truly make it yours—use whatever candies match your aesthetic or what the kids choose.
- Toast your coconut in a dry skillet over medium heat for three to five minutes to unlock a richer, more complex flavor that elevates the whole cake.
- If you're nervous about the cutting, search for an Easter bunny cake template online and trace it onto cardboard as a guide before you start slicing.
- Keep a small spatula and bowl of warm water nearby while decorating—dipping the spatula in warm water helps smooth frosting and fix any accidents seamlessly.
 Save
Save This cake has a way of becoming tradition the moment someone tries it, which is exactly what spring celebrations deserve. Make it, decorate it however brings you joy, and know that you're creating something far bigger than just dessert.
Cooking Q&A
- → What type of flour is best for this cake?
All-purpose flour ensures a tender crumb and sturdy structure for shaping the cake.
- → How do I achieve the fluffy texture in the frosting?
Beating softened butter thoroughly before adding powdered sugar and milk results in a light and airy frosting.
- → Can I prepare this cake ahead of time?
Yes, cake layers can be baked a day early and tightly wrapped to maintain freshness before assembly.
- → What decorations work best for the bunny details?
Use jelly beans, licorice strings, and mini marshmallows to create facial features and accents on the bunny shape.
- → Is there a way to add extra flavor to the coconut topping?
Toasted coconut can replace sweetened shredded coconut for a deeper, nuttier flavor profile.