 Save
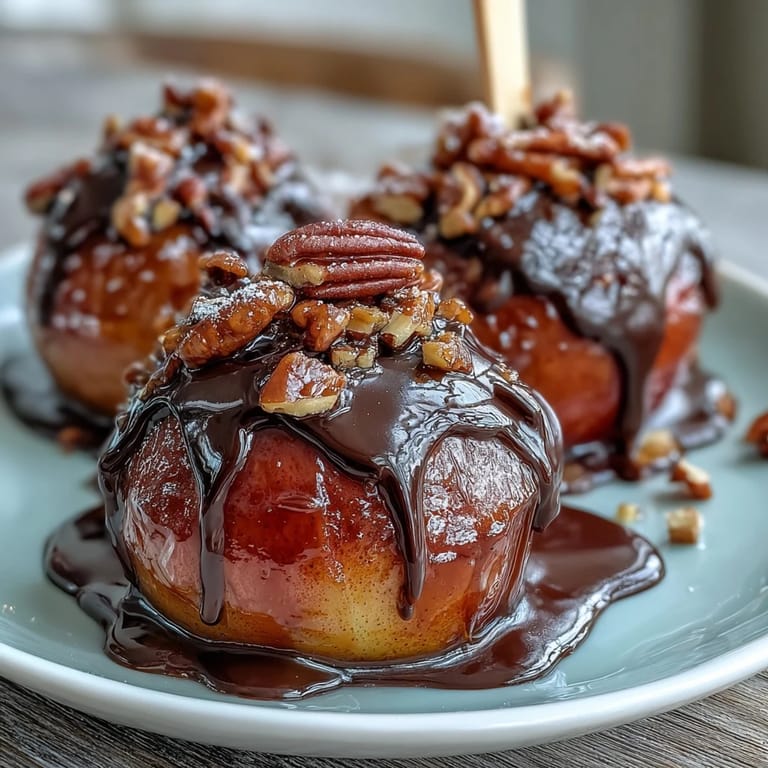
Save My neighbor knocked on the door one autumn afternoon with a box of apples from her orchard, and I found myself standing in the kitchen wondering what to do with a dozen glossy Granny Smiths. That's when I remembered my grandmother's candy apples from county fairs, but I wanted something less commitment-heavy—something you could grab and eat without the sticky fingers. These apple slices, dipped in caramel and striped with dark chocolate, became my answer: all the joy of the carnival treat, but refined enough to serve at dinner parties.
I made these for my book club last month, and something unexpected happened: everyone stopped mid-sentence when they took a bite, which felt like a small victory in a room full of talkers. The combination of the cool crunch and warm, melting caramel seemed to trigger genuine silence, followed by requests for the recipe before they'd even finished chewing.
Ingredients
- Crisp apples (Granny Smith or Honeycrisp): The tartness keeps these from becoming cloying, and the firmness means they won't collapse when you dip them; lemon juice brushed on the fresh cut edges buys you time before browning sets in.
- Soft caramel candies: Unwrapped candies are easier than making caramel from scratch, and they melt smoothly with just a touch of cream.
- Heavy cream: This transforms the caramel from thick and stubborn into something pourable and glossy.
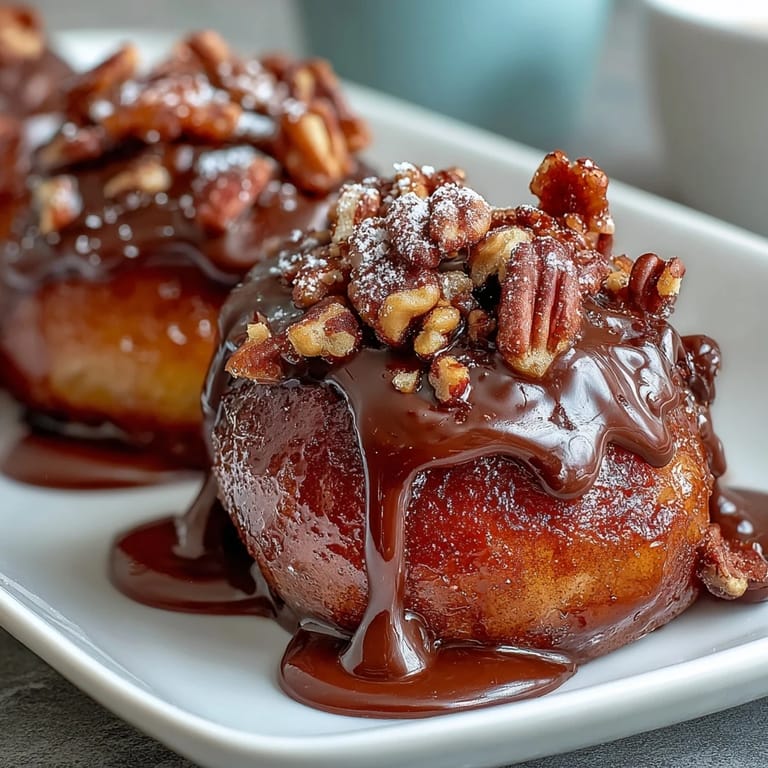
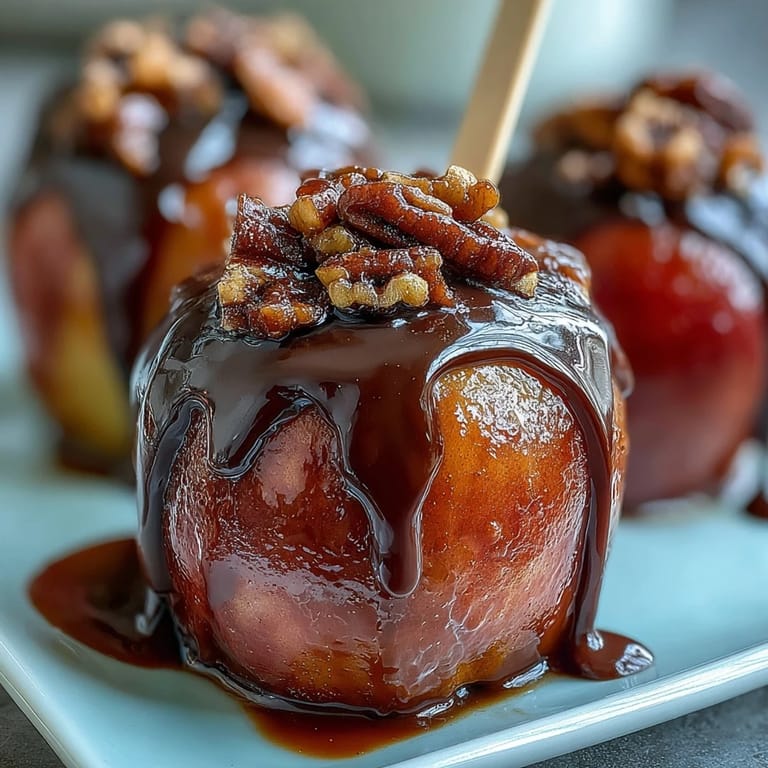
- Dark chocolate (60–70% cocoa): The bittersweet balance prevents the whole thing from tasting like pure sugar, and it hardens beautifully when chilled.
- Coconut oil or unsalted butter: Just a teaspoon thins the chocolate enough to drizzle without making it taste greasy.
- Garnishes (nuts, sprinkles, flaky salt): These are optional but honestly essential—they add texture and a moment of flavor surprise that makes each bite feel intentional.
Tired of Takeout? 🥡
Get 10 meals you can make faster than delivery arrives. Seriously.
One email. No spam. Unsubscribe anytime.
Instructions
- Prep your apples like you mean it:
- Slice them into wedges, toss with lemon juice, and pat them completely dry with paper towels—any moisture will make the caramel slip right off. This step feels fussy but matters more than you'd think.
- Give them handles:
- Insert a popsicle stick or skewer into each slice so you have something to hold onto without your fingers getting sticky.
- Melt the caramel gently:
- Low heat is your friend here; high heat will make the caramel seize and taste bitter. Stir the unwrapped candies with heavy cream until they're completely smooth, then let it cool just long enough that you don't burn your fingers dipping.
- Dip with confidence:
- Plunge each apple slice halfway into the caramel, let the excess drip off for a few seconds, and place it on a parchment-lined baking sheet. Don't overthink it.
- Chill to set:
- Five minutes in the fridge gives the caramel a moment to firm up before you add chocolate on top.
- Melt chocolate like a gentle whisper:
- Use 20-second bursts in the microwave, stirring between each one, so the chocolate stays silky and doesn't seize. Stir in coconut oil or butter to loosen it just enough to drizzle.
- Drizzle and decorate:
- Let your hand move freely as you drizzle chocolate over each caramel-coated slice, then immediately add garnishes if you're using them—the chocolate needs to still be warm enough for them to stick.
- Final chill:
- Another 5 to 10 minutes in the fridge sets the chocolate and keeps the apples crisp.
 Save
Save There's something small but meaningful about how these turn a casual Tuesday evening into something that feels a little more intentional. My kids asked me to make them again the next week, which meant they'd stopped seeing them as a novelty and started seeing them as part of our regular rotation—the highest compliment a recipe can get.
The Magic of the Crunch
The reason these work so well is the contrast between textures: that snappy apple bite against the yielding caramel, then the snap of dark chocolate setting your teeth. This is something I've learned from making candy apples a dozen different ways—texture matters as much as flavor, maybe more. When you bite into one, you should hear yourself chew.
Timing and Temperature
The window between dipping and chilling is short but crucial, and it taught me something about cooking in general: sometimes the best results come from not overthinking. If you let the caramel get too cool, it won't flow smoothly; too warm and it'll drip off. The same goes for the chocolate—too hot and it slides, too cool and it clumps.
Making Them Your Own
These slices are the recipe, but they're also a canvas. I've tried them with white chocolate and crushed peppermint, with milk chocolate and chopped pretzels, with sea salt and nothing else. Each version tells a different story depending on what's in your pantry or what mood you're in.
- Try pairing dark chocolate with a tiny pinch of sea salt for a sophisticated, slightly salty finish that keeps people coming back.
- If you're making these ahead, store them in an airtight container in the fridge for up to two days, though they're honestly best fresh.
- These make stunning gifts when nestled in a pretty box with parchment between the layers, and they say far more than store-bought chocolate.
 Save
Save These candy apple slices have become my go-to when I need to feel like I've done something special without having spent my whole evening in the kitchen. They're a small gesture that somehow feels generous.
Cooking Q&A
- → How do I prevent apple slices from browning?
Coat the apple slices lightly with lemon juice immediately after slicing to keep them fresh and prevent discoloration.
- → Can I use other types of chocolate for drizzling?
Yes, white or milk chocolate can be used for a sweeter variation if preferred over dark chocolate.
- → How can I make the topping set properly?
After dipping in caramel, chill the slices to set the coating before drizzling with chocolate, then chill again until the chocolate firms up.
- → Are there nut-free garnish options?
Certainly, you can omit nuts or substitute with seeds like pumpkin or sunflower seeds for added crunch without nuts.
- → What tools are needed for preparation?
Basic tools include a baking sheet lined with parchment, small saucepan for melting caramel, microwave-safe bowl for chocolate, skewers or sticks, and mixing spoons.
- → Is this suitable for gluten-free diets?
Yes, if using gluten-free caramel and chocolate, this treat is safe for gluten-sensitive diets.