 Save
Save I discovered this recipe during a season when I was tired of feeling guilty about dessert. A friend mentioned she'd been blending cottage cheese into her baking, and I thought she was joking until she brought over a slice of something impossibly creamy and chocolatey that somehow felt lighter on my chest than traditional cheesecake ever did. That first bite made me curious enough to experiment, and after a few kitchen mishaps (including one where I didn't blend the cottage cheese nearly smooth enough), I landed on this version that actually tastes indulgent while delivering real protein and satisfaction.
I made this for my sister's birthday dinner last spring, nervous that substituting cream cheese might disappoint people who take their cheesecake seriously. Instead, three of her guests asked for the recipe before dessert was even finished, and one admitted she preferred it to the traditional version she'd grown up with. That moment sitting around the table, watching people genuinely enjoy something I'd worried about, reminded me that the best food is the kind that doesn't announce what it's trying to be.
Ingredients
- Graham cracker crumbs (120 g): They anchor the cheesecake with a familiar crunch, and toasting them briefly in the oven with cocoa helps deepen their flavor before the filling even touches them.
- Coconut oil or melted butter (30 g): Either works beautifully for binding, though coconut oil keeps things slightly lighter if that matters to your goals.
- Unsweetened cocoa powder (1 tbsp for crust, 50 g for filling): The crust amount seems small until you taste how it intensifies the chocolate story throughout the whole dessert.
- Maple syrup (1 tbsp for crust, optional for topping): It adds subtle warmth without being aggressively sweet, and it helps the crust hold together without extra sugar.
- Low-fat cottage cheese (500 g): This is the secret weapon, and it must be blended until completely smooth or you'll taste the difference; this step is non-negotiable.
- Plain Greek yogurt (150 g): It contributes tang, creaminess, and protein without making the filling curdle or separate as it bakes.
- Large eggs (2): They set the filling gently and create structure, so don't skip them or try to substitute without understanding how it changes the chemistry.
- Granulated sugar or sweetener (100 g): Adjust to your preference, though I find this amount balances the cocoa without making it cloying.
- Vanilla extract (1 tsp): A good quality version rounds out the chocolate and prevents it from tasting flat or one-dimensional.
- Cornstarch (1 tbsp): It prevents cracks by stabilizing the filling as it cools, a small addition that makes a visible difference.
- Dark chocolate chips, melted and cooled (60 g): Melting and cooling them prevents the filling from being too hot when you fold them in, which keeps the texture silky.
- Greek yogurt for topping (30 g optional): This creates a light cloud on top that looks intentional and tastes bright against the chocolate.
Tired of Takeout? 🥡
Get 10 meals you can make faster than delivery arrives. Seriously.
One email. No spam. Unsubscribe anytime.
Instructions
- Set up and preheat:
- Heat your oven to 170°C (340°F) and line your springform pan base with parchment paper so removing this later doesn't turn into a wrestling match. This small step saves you from the heartbreak of cheesecake stuck to the bottom.
- Build the crust:
- Combine graham cracker crumbs, cocoa powder, coconut oil, and maple syrup in a bowl, mixing until it feels like damp sand. Press it firmly and evenly into the pan bottom, then bake for 8 minutes so it sets just enough to support the filling without crumbling when you pour.
- Blend the cottage cheese smooth:
- This step genuinely determines your texture, so spend the full 1–2 minutes in the food processor until there are absolutely no graininess or lumps visible. Rush this and you'll taste the difference, so don't be tempted to skip ahead.
- Create the filling:
- Add Greek yogurt, eggs, sugar, cocoa powder, vanilla, cornstarch, and the cooled melted chocolate to your blended cottage cheese, blending until everything is silky and completely combined. The mixture should pour smoothly and look like luxurious mousse.
- Pour and bake:
- Spread the filling over your cooled crust, smoothing the top gently, then slide the whole pan into the oven. Bake for 35–40 minutes until the center is just set but still slightly wobbly when you gently jiggle the pan, which means it's cooked perfectly.
- Cool thoughtfully:
- Turn off the oven and crack the door open just a few inches, letting the cheesecake cool slowly inside for 1 hour so it doesn't shock and crack. This patient cooling step is what gives you that smooth, creamy texture instead of a fractured surface.
- Chill and finish:
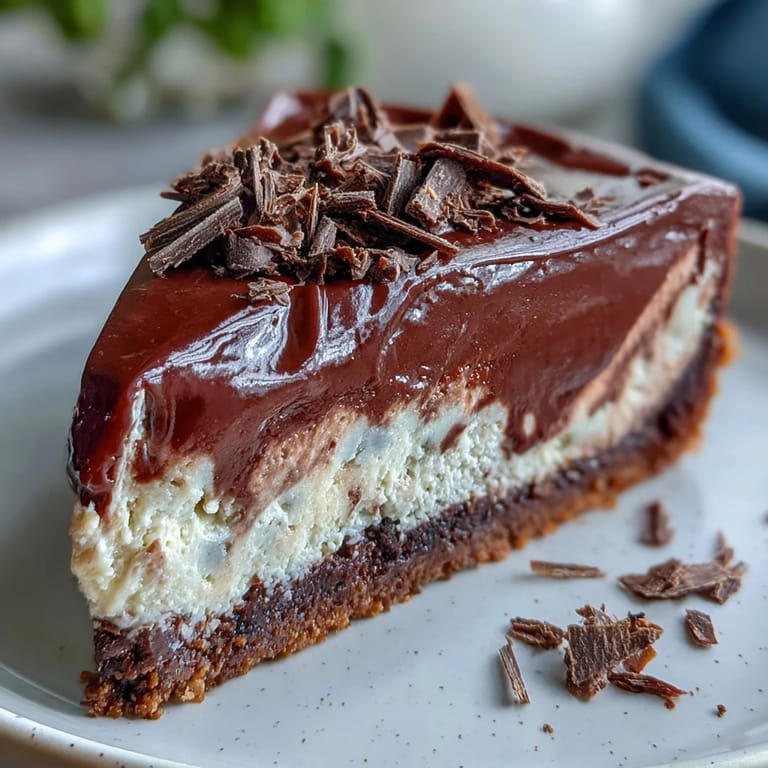
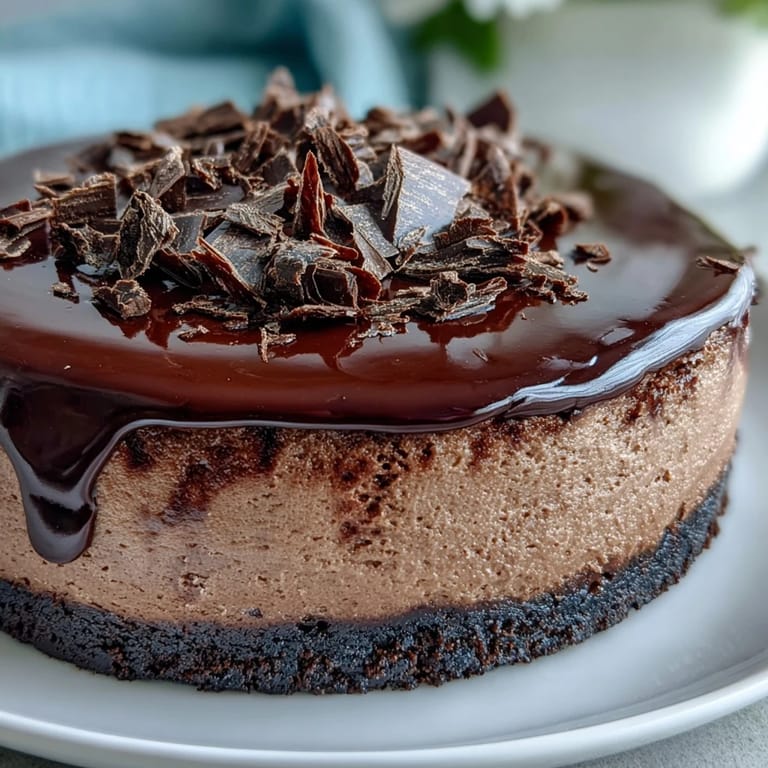
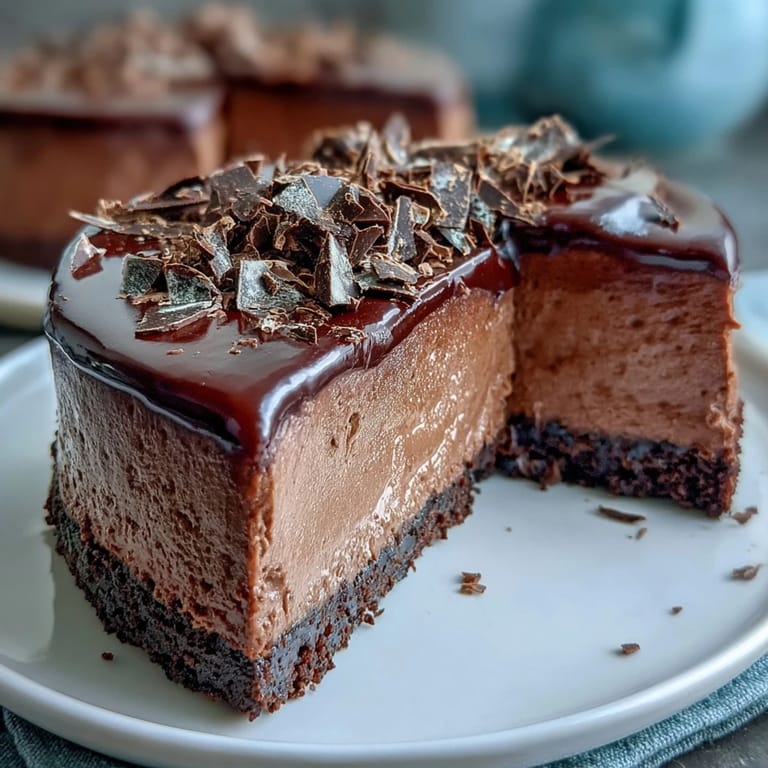
- Remove the cheesecake from the oven and refrigerate for at least 3 hours until it's completely set and cold. Before serving, spread with Greek yogurt if you'd like and finish with dark chocolate shavings.
 Save
Save My mom took one bite and said it reminded her of the chocolate mousse her grandmother used to make, except this one had substance and stayed with you. That was maybe the highest compliment I've ever received for a dessert, because it meant I'd created something that honored tradition while being entirely its own thing.
Why the Cottage Cheese Swap Actually Works
Cottage cheese sounds weird in dessert until you understand that when it's completely blended, it becomes creamier and lighter than cream cheese while packing twice the protein. The Greek yogurt adds just enough tang to prevent the whole thing from tasting flat, and together they create a filling that bakes more gently and sets more reliably than traditional cheesecake ever did. I stopped worrying about cracks and water rings once I switched, because the chemistry of these ingredients is just more forgiving.
The Science of Setting Without Sinking
The cornstarch is doing invisible work in the background, absorbing moisture and preventing the kind of cracks that happen when a dense custard-like filling cools too quickly. The eggs set the structure while the yogurt and cottage cheese keep it from becoming rubbery, creating something in between mousse and traditional baked cheesecake. The slow oven-door cooling is what seals the deal, letting the temperature drop gradually so the filling contracts evenly instead of suddenly and violently.
Serving and Storage Wisdom
This cheesecake stays fresh in the refrigerator for up to five days, and honestly tastes better on day two after the flavors have had time to settle and deepen. It's also surprisingly good frozen for up to a month, thawing beautifully if you move it to the fridge the night before serving. Pair it with fresh raspberries or a drizzle of honey if you want brightness against the chocolate, or eat it plain if you want to taste exactly what your kitchen created.
- Let it come to room temperature for ten minutes before slicing so the knife glides cleanly without cracking the surface.
- Run a thin knife under hot water and wipe it between slices if you're serving at a gathering and want each piece to look intentional.
- The yogurt topping and chocolate shavings are optional but make plating feel special without adding much effort.
 Save
Save Every time I make this, I'm struck by how a single ingredient swap transformed a dessert I loved into one I actually feel good about eating. It's chocolate cheesecake that tastes like you deserve it, not like you're apologizing for wanting it.
Cooking Q&A
- → Can I taste the cottage cheese?
When blended thoroughly, the cottage cheese becomes completely undetectable. The finished product has a smooth, creamy texture without any lumps or distinctive cheese flavor.
- → How long does this need to chill?
Refrigerate for at least 3 hours, though overnight chilling produces the best texture and flavor. This allows the filling to fully set and the flavors to meld together.
- → Can I make this gluten-free?
Absolutely. Simply swap regular graham crackers for gluten-free alternatives in the crust. All other ingredients naturally contain no gluten.
- → Why cool the cheesecake in the oven?
Gradual cooling prevents cracking by letting the structure set slowly. Cracking the oven door releases heat gently, helping maintain that smooth surface.
- → Can I freeze leftovers?
Yes, slice and wrap individual portions tightly before freezing for up to 3 months. Thaw overnight in the refrigerator for best results.
- → What sweetener works best?
Granulated sugar provides classic sweetness, but maple syrup, honey, or your preferred sweetener substitute work equally well in this versatile chocolate creation.