 Save
Save Last summer, I was scrolling through low-carb recipe forums late at night when someone mentioned baking cheese into crispy buns, then stuffing them with pickles. It sounded absurd at first, but something about the combination of melted sharp cheddar and tangy pickle juice intrigued me enough to try it the next morning. The moment I pulled those golden, bubbling cheese rounds from the oven, the kitchen filled with this savory, slightly funky aroma that made me smile. My partner walked in skeptical but curious, and by the time we'd assembled the first sandwich, we were both hooked.
I made these for a casual potluck where everyone was supposed to bring something gluten-free friendly, and I'll admit I was nervous about how they'd land. But watching people's faces when they bit into the warm cheese bun and hit that crunch of pickle was worth every second of doubt. One friend literally asked if I'd made a mistake with the recipe because she couldn't believe something this indulgent qualified as low-carb. That afternoon, I realized the best food moments happen when something unexpected becomes the highlight.
Ingredients
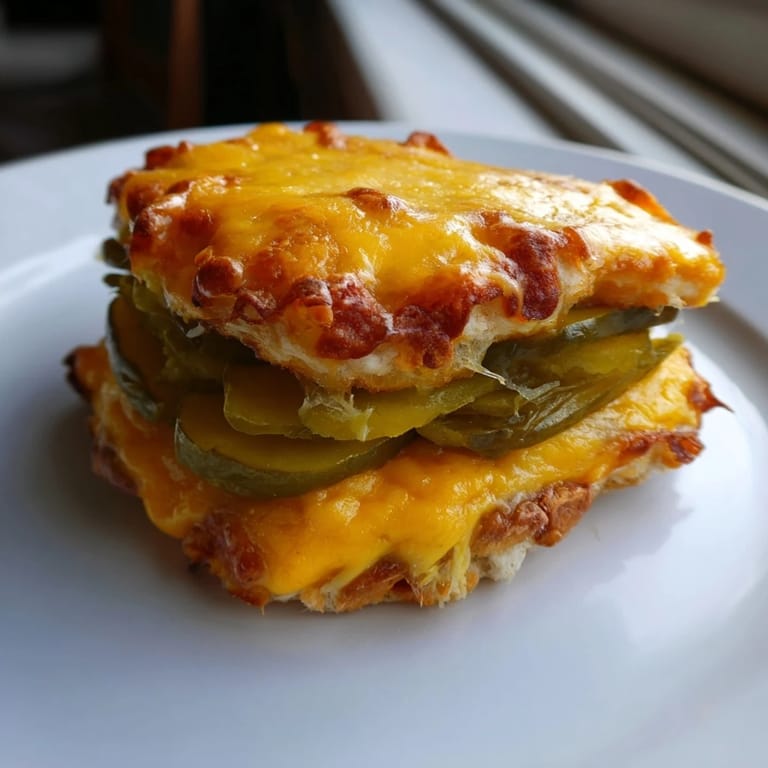
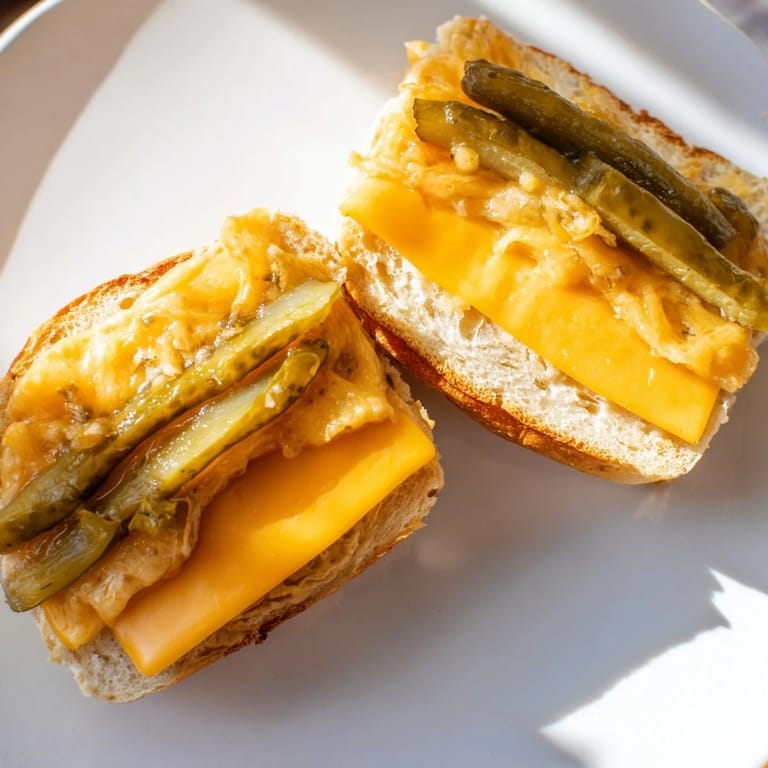
- Sharp cheddar cheese: You want thick slices, ideally cut yourself from a block rather than pre-sliced; they melt into a sturdy, crispy-edged bun instead of turning into thin, greasy circles.
- Sandwich pickle slices: Long dill pickles are essential here, and you must pat them dry with paper towels or they'll steam the cheese and create a soggy mess instead of that essential crunch.
- Mayonnaise and Dijon mustard: Both optional but highly recommended; the tang of the mustard echoes the pickles while mayo adds richness that balances the sharp cheese.
- Tomato slices: A brightness that cuts through the heaviness, but only if you want it; the sandwich works perfectly without.
- Deli turkey or ham: Adds a savory protein layer, though vegetarian versions are equally satisfying if you lean into the cheese and pickle flavors.
Tired of Takeout? 🥡
Get 10 meals you can make faster than delivery arrives. Seriously.
One email. No spam. Unsubscribe anytime.
Instructions
- Preheat and prepare:
- Set your oven to 400°F and line a baking sheet with parchment paper or spray it lightly with nonstick spray. This prevents the cheese from sticking and makes cleanup effortless.
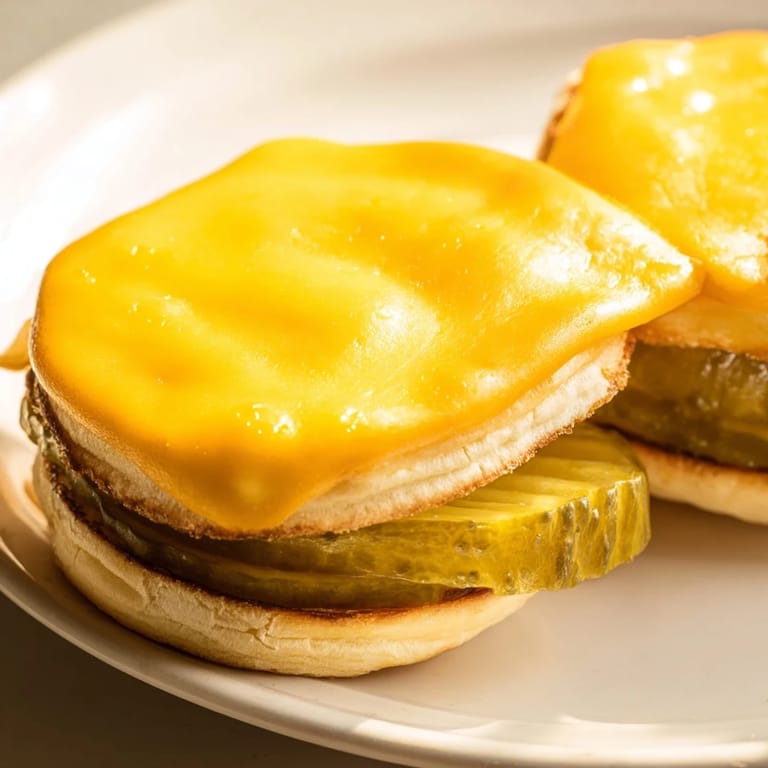
- Layer the cheese and pickles:
- Arrange four cheddar slices on the sheet, spacing them well apart so they can spread and crisp at the edges without touching. Lay your dried pickle slices in a single overlapping layer on top of each cheese slice, covering most but not all of the surface.
- Seal the buns:
- Top each pickle-covered slice with another piece of cheddar, pressing gently to create a sealed packet. You're not pressing hard enough to squeeze juice out, just enough to ensure they fuse together as they bake.
- Bake until golden:
- Slide into the oven for seven to eight minutes, watching until the cheese is melted and bubbly at the edges with a light golden-brown color. You'll know it's ready when the aroma becomes almost irresistible.
- Cool and set:
- Remove from the oven and let the buns rest for about five minutes; this allows the cheese to firm up just enough to handle without falling apart, but they'll still be warm.
- Add fillings:
- If using mayo and mustard, spread them on the inside of each warm cheese bun, then add tomato slices and deli meat as desired. Warm toppings melt slightly into the cheese, while cold vegetables add a refreshing contrast.
- Assemble and serve:
- Carefully place your fillings between two cheese-pickle buns, treating them gently since they're delicate when warm. Serve immediately while the cheese is still crispy and the whole thing feels like a warm hug.
 Save
Save There was this one afternoon when my mom visited and I made these almost as a joke, like, "Hey, I found this weird recipe online." She took one bite and got quiet in that way she does when something genuinely surprises her, then asked for the recipe to make for her book club. That moment reminded me that the best dishes are often the ones that break the rules a little.
Flavor Combinations That Work
The magic here is in the contrast: the sharpness of aged cheddar plays beautifully against the bright, fermented tang of dill pickles, while the crispy edges and soft melted interior create a textural balance. If you want to explore beyond the classic, Swiss cheese brings a nuttiness that softens the pickle bite, while provolone adds a slightly smoky depth. Some people swear by mixing equal parts cheddar and Swiss for a middle ground that feels less intense but still deeply satisfying.
Timing and Temperature Matter
I learned the hard way that 400°F is the sweet spot; lower temperatures make the cheese melt too slowly and the pickles can lose their crunch, while higher temperatures brown the edges too quickly before the inside melts properly. The eight-minute window is tight but forgiving if you're paying attention, and every oven is a little different, so trust what you see more than the timer. That cooling period isn't just about handling the buns safely; it's the difference between something that holds together and something that collapses under its own warmth.
Making It Your Own
The beauty of this recipe is how customizable it is without losing its identity. I've made versions with everything from crispy lettuce to sliced jalapeños to bacon bits tucked between the layers, and each variation feels fresh because the cheese-pickle foundation is so distinctive. You can make it as minimal or as loaded as your mood calls for, and it still delivers that same satisfying contrast.
- For extra crunch without adding bulk, scatter shredded lettuce between the cheese bun and other fillings, or add a thin layer of thinly sliced red onion for sharpness.
- Spicy versions work surprisingly well; try hot dill pickles instead of regular, or nestle a few jalapeño slices inside each bun before the final cheddar layer melts everything together.
- Reheating in a toaster oven for two to three minutes restores the crispness better than the microwave, which tends to make everything limp and disappointing.
 Save
Save This sandwich has become my go-to when I want something that tastes indulgent but respects my body's needs, which is its own kind of magic. Every time I make it, I think of all the people who said low-carb cooking had to be boring, and I smile.
Cooking Q&A
- → What type of cheese works best for the buns?
Sharp cheddar is ideal for its strong flavor and melting properties, but Swiss or provolone can be used for variation.
- → How do you prevent the cheese from sticking to the baking sheet?
Use parchment paper or lightly spray the baking sheet with a nonstick cooking spray before baking.
- → Can I add extra fillings inside the buns?
Yes, optional fillings like mayonnaise, Dijon mustard, tomato slices, or deli meats can enhance the flavor and texture.
- → How do you keep the buns crispy after baking?
Allow the buns to cool for a few minutes so the cheese sets, and reheat briefly in a toaster oven to restore crispness if needed.
- → Are there any dietary considerations for this dish?
It’s low-carb, gluten-free, and vegetarian-friendly if meat fillings are omitted. It contains dairy and possibly eggs and mustard, depending on optional ingredients.