 Save
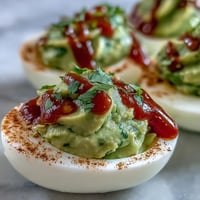
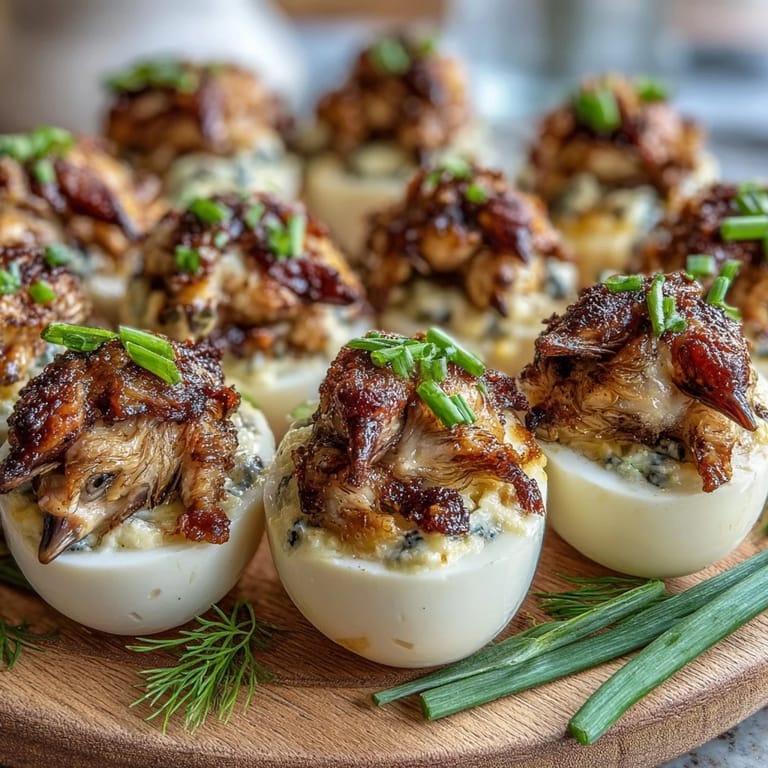
Save My nephew pressed his nose against the kitchen window one Easter morning, watching me arrange eggs on a platter. "Why do they look like babies?" he asked, and suddenly I realized these weren't just deviled eggs—they were tiny edible creatures that made him smile before he even tasted one. That's when deviled egg chicks went from a simple appetizer to the dish I'd make every spring, less for the flavor and more for the genuine delight on kids' faces when they figured out what they were eating.
Last year I made these for my daughter's classroom party, and the teacher told me later that one shy kid who "didn't like eggs" somehow ended up eating three of them. His mom was shocked. I wasn't—there's something about food that looks like it's hatching that makes people forget they have opinions about ingredients.
Ingredients
- Eggs: Use large eggs at room temperature if possible, as they peel more cleanly after boiling than cold eggs straight from the fridge.
- Mayonnaise: Full-fat mayo creates that silky, rich filling that holds everything together, though Greek yogurt works beautifully if you want something lighter.
- Yellow mustard: Just a teaspoon, but it's the little flavor jolt that keeps the filling from tasting one-note.
- White vinegar: A tiny splash adds brightness and prevents the filling from ever feeling heavy.
- Salt and black pepper: Taste the filling before you declare it done—these amounts are starting points, not rules.
- Black peppercorns: Whole ones work best for eyes because they sit on top without rolling off, though sliced black olives are softer and just as charming.
- Carrot: Use a firm, fresh carrot and cut it with a sharp paring knife so the pieces stay small and delicate instead of crumbling.
Tired of Takeout? 🥡
Get 10 meals you can make faster than delivery arrives. Seriously.
One email. No spam. Unsubscribe anytime.
Instructions
- Boil the eggs:
- Place eggs in a single layer in a large saucepan, cover with cold water, and bring to a boil over medium-high heat. Once the water reaches a rolling boil, cover the pan, remove it from heat, and let the eggs sit undisturbed for exactly 10 minutes—this gentle method gives you creamy centers and makes peeling feel effortless.
- Cool in ice water:
- Transfer the eggs to a bowl of ice water and let them sit for about 5 minutes until completely cool to the touch. Cold eggs are sturdier to handle and their shells release more easily when you start peeling.
- Peel and prep:
- Gently crack and peel each egg under cool running water, using your thumbs to loosen the shell from the white. Pat the peeled eggs dry with a paper towel so they don't slip around while you're working.
- Create the base:
- Using a small sharp knife, slice a thin slice off the bottom of each egg so it stands upright on your serving tray without wobbling. Then carefully slice off the top third horizontally, setting these caps aside—they'll become the hatching shells.
- Extract and mash:
- Scoop out the yolks and place them in a bowl, arranging the egg white bottoms on your serving tray. Add mayonnaise, mustard, vinegar, salt, and pepper to the yolks, mashing with a fork until the mixture is smooth and creamy with no visible lumps.
- Fill the whites:
- Using a small spoon or piping bag, fill each egg white base with the yolk mixture, mounding it slightly so it looks like the chick's head is peeking up. Don't be afraid to pile it a little—the filling should look generous and inviting.
- Add the caps:
- Place the egg white caps back on top at a slightly jaunty angle, as if the chick is just emerging from its shell. This tilted pose is what makes them feel alive and charming.
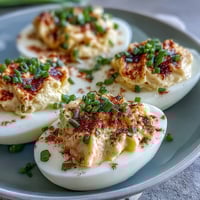
- Carve the carrot:
- Cut a firm carrot into tiny triangles for beaks and thin slivers for feet, then gently press these pieces into the yolk mixture so they stay put. Don't worry about perfection here—slightly irregular pieces look more whimsical anyway.
- Add the eyes:
- Press two black peppercorns into each chick's filling where the eyes should go, positioning them so the chicks seem to be looking forward and feeling cheerful. Step back and admire—you've just created an adorable army of edible babies.
- Garnish and chill:
- Scatter fresh chives or parsley around the chicks if you want a touch of green color, then refrigerate until ready to serve. These hold beautifully for up to a day covered loosely with plastic wrap.
 Save
Save There's a specific moment when you press the peppercorn eyes onto each chick, and suddenly the filling stops looking like egg salad and becomes a creature with personality. That tiny shift—from ingredient to character—is why people remember these eggs long after they've eaten them.
Making the Filling Taste Perfect
The classic deviled egg filling has been perfected over generations, and this version follows that wisdom: mayonnaise for richness and body, mustard for brightness, vinegar for tang, and salt and pepper to make everything sing. Some cooks add a pinch of paprika for color or a small handful of finely chopped fresh herbs like dill or tarragon, which transforms the filling from traditional to unexpectedly sophisticated. Taste as you go—you're making something creamy and seasoned to your preference, not following a rigid formula. The filling should taste bold enough to stand on its own, because the egg white is a mild canvas that needs flavor to shine.
Decorating Like You Mean It
The carrot decorations are where these eggs become art instead of food, and the good news is that imperfection makes them more charming. Tiny, slightly irregular triangles look more hand-carved and less factory-made, which is exactly the aesthetic these deserve. A firm fresh carrot slices and cuts more cleanly than an old, limp one, so check your vegetable drawer and use the crispest carrot you have. If carrot feels too rigid or keeps cracking, a moment under warm running water softens it just enough to cut smoothly. The beak should angle forward slightly, almost like the chick is chirping or reaching toward something, which brings the whole creature to life.
Storage and Make-Ahead Magic
These eggs are one of the best make-ahead appetizers because they actually taste better after a few hours in the fridge—the flavors meld and deepen, and the filling firms up slightly so it holds its shape even more beautifully. You can assemble them completely up to 24 hours ahead, storing them in a covered container on a shelf where they won't tip over. If you're concerned about the peppercorn eyes rolling off during transport, add them just before serving—it takes 30 seconds and guarantees they'll arrive picture-perfect. For a party, this means you can do all the work the day before and simply pull them from the fridge when guests arrive.
- Keep them covered loosely with plastic wrap so the egg whites don't dry out but air can still circulate slightly.
- Transport them in a shallow container with a secure lid, nestling them in shredded lettuce or parsley so they don't slide around.
- Let them sit at room temperature for about 10 minutes before serving so the filling softens into perfect creaminess.
 Save
Save These little chicks have a way of becoming a family tradition once you make them once, requested every spring and eagerly anticipated by people who might not otherwise care much about deviled eggs. There's something magical about turning a classic comfort food into something playful without losing any of the flavor that made it beloved in the first place.
Cooking Q&A
- → How do I cook the eggs perfectly for this dish?
Boil eggs over medium-high heat for 10 minutes after water reaches a boil, then cool them in ice water to stop cooking and ease peeling.
- → What can I substitute for mayonnaise in the filling?
Greek yogurt is a great lighter alternative that maintains the creamy texture with a slightly tangy flavor.
- → How do I make the chicks’ beaks and feet?
Use small carrot triangles for the beaks and thin carrot slivers for the feet, gently pressing them into the filling.
- → Can I prepare these in advance?
Yes, they can be assembled and refrigerated covered for up to one day without losing freshness.
- → How do I create the chick’s eyes?
Place two whole black peppercorns on each chick for eyes, or substitute with tiny black olive pieces for a softer option.